 Online: 3024
Excel > Back to Basic
Print options in Excel
How to take print out from MS Excel and setup page properties?
In the previous post, we learnt about data validations in MS Excel. In this post, we shall learn how to take print out of Excel worksheet and how to set different printing settings.
To open the Print dialog box, go to File > Print and you would see a screen similar to this.
If all the values are showing correct in your dropdown, simply hit Print (the bit one) button and it goes straight to the printer.
If your system is connected to multiple printers then you have option to select on which printer you want to send the print. Click on the Printer dialog box and you should see the list of printers.

Apart from list of printers, we als have following options
- Microsoft Print to PDF - this converts your sheet into .pdf format
- Microsoft XPS Document Writer - this converts your sheet into XPS format
- Send to OneNote XXXX - takes this sheet to OneNote.
To navigate through different pages in the Preview, click on page left and right arrow that appears at the bottom of the screen.
When you go back to your sheet from Print dialog box, you see a dashed vertical and horizontal line as shown in the picture below. This indicates that how many columns are being printed in a page, if you want to adjust the column width you may do so and this vertical line will help you know whether your columns are fitting in that page or not. The same applies to the horizontal dashed line. These lines are just a page indicator to know what data is going in what page.
How to print entire worksheet, workbook and selected cell in the Excel?
To get more control into what and how much we want to print, we can use 'Print Active Sheets' dropdown.
- Print Active Sheets - print the sheet on which you are working currently
- Print Entire Workbook - prints the entire workbook (a workbook can contains many worksheets)
- Print Selection - prints only those cells that are selected in the worksheet

To print into portrait and landscape orientation, use this option. Click on the 'Portrait Orientation' dropdown and change the orientation you want to print into.

In case you are printing multiple copies of the worksheet, you may want to use Collated or Uncollaged options.
What is Collated and Uncollated?
Let's assume, we want to print 8 copies of the worksheet.
Collated option will print 1st copy of the entire worksheet and then 2nd copy of the entire worksheet .... and then 8th copy of the entire worksheet.
Uncollated option will print 8 copies of 1st page, 8 copies of 2nd page, 8 copies of 3rd page etc.
You can select Collated option from 'Collated' dropdown as per your requirement.
How to change the Page size in Excel?
To change the page size, click on 'Letter' dropdown and you would be presented with several standard page sizes. Select anyone that suits you.
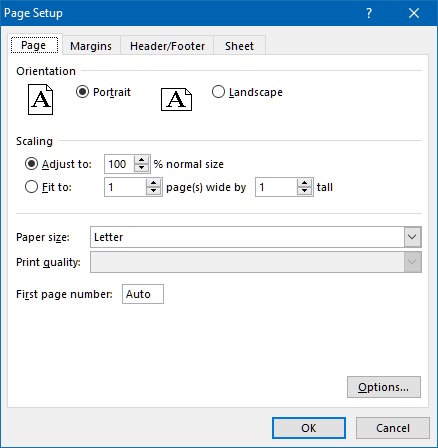
If your page size is custom, click on 'More Paper Sizes...' appearing at the bottom of this dropdown. This takes you to the Page Setup dialog box. Here either you select the page size from 'Paper size' dropdown or click on 'Options...' button that takes you to the Printer Properties dialog box where you can completely customize the size of the paper.

How to setup the page margin in Excel?
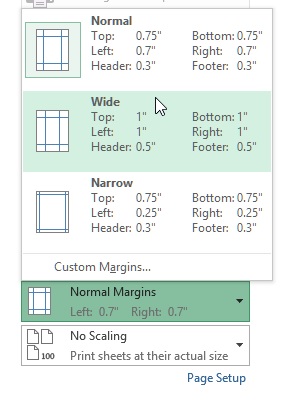
To setup the paper margin in Excel, click on 'Normal' dropdown that shows few pre-set margins. Select any one of them if that suits you.

If not, click on 'Custom Margins...' that appears at the bottom of this dropdown options. This will open up again the Page Setup dialog box however this time, the 'Margins' tab will be selected.

Here you have complete control over what value you give for different direction margins. You can also specify margin of the header and footer.
Instead of setting up custom margin through dialog box, we can also do this visually. Click on the 'Show Margins' icon at the bottom-right corner of the Print dialog box.
this shows the margin notation on the Preview, use mouse cursor to drag the margin. Notice that the Margin dropdown value has changed to 'Last Custom...'.

How to use scaling of pages in Excel?
Many a times we see that few of the columns gets printed on other pages. To solve this problem, we can use this option.

Clicking on 'No Scaling' dropdown shows following options
- No Scaling - prints as it appears on the worksheet
- Fit Sheet on One Page - shrinks the data of worksheet so that it fits in one page
- Fit All Columns on One Page - shrinks the column size to fit in one page width
- Fit All Rows on One Page - shrinks all data to fit into one page height
How to setup header and footer in MS Excel?
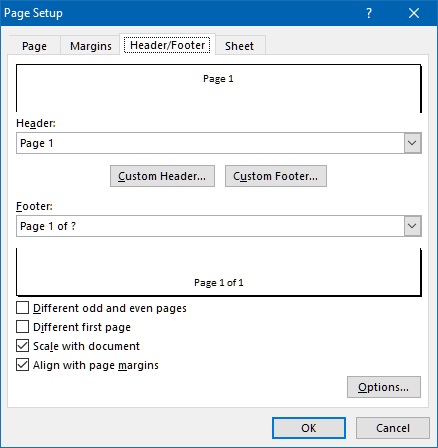
To setup header and footer in MS Excel, click on 'Page Setup' link at the bottom of the Print dialog box. Select Header/Footer tab. On this dialog box, you see different options in header and footer dropdown. Select anyone of them based on your requirement and press OK.

To customize header/footer, click on 'Custom Header...' and 'Custom Footer...' respectively. Clicking on 'Custom Header...' shows below dialog box where we can write custom header that may appear in left, center or right of the page.
How to change the Page order in MS Excel?
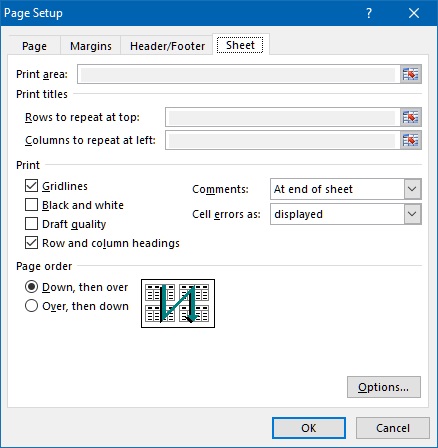
By default, MS Excel marks the page number vertically (Down, then over). It counts the number of pages down based on what is the last row in which at least one cell is having data. To start marking the page horizontally, select 'Over, then down' radio button under 'Page order' heading.

Quickies 
To quickly see the actual size of the text going to appear in the print, click on the right most icon (Zoon to Page) at the bottom-right of the Print dialog box.
that will show the acutal size of the text that will appear on the printer.


