 Online: 11073
ASP.NET MVC > Web API
Update record using Web API in ASP.NET MVC
How to update record to database by consuming ASP.NET Web API from ASP.NET MVC View?
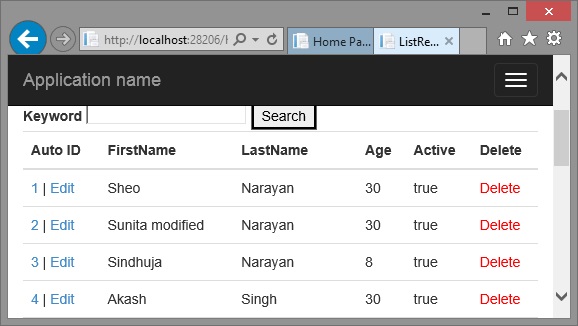
To demonstrate update record into the database, we have updated the list view of listing post to add a Edit link just beside the Auto ID value as demonstrated below.

Clicking Edit link send the user to Edit action method of the controller with autoid querystring value. The action method looks like below.
http://localhost:28206/home/edit?autoid=2
CONTROLLER ACION METHOD
public ActionResult Edit()
{
    return View();
}
This method simply shows the Edit view as shown below.
VIEW CODE
@{
    ViewBag.Title = "Edit";
}

<h2>Edit</h2>
    <div>
        <label>First Name</label>
        @Html.TextBox("FirstName")
    </div>
    <div>
        <label>Last Name</label>
        @Html.TextBox("LastName")
    </div>
    <div>
        <label>Age</label>
        @Html.TextBox("Age")
    </div>
    <div>
        <label>Active</label>
        @Html.DropDownList("Active", new List<selectlistitem>
        {
new SelectListItem {Text = "Yes", Value = "true", Selected = true},
new SelectListItem {Text = "No", Value = "false"},
}, "Select ...")
    </div>
    <div>
        <button id="btnAdd">Add</button>
        @Html.ActionLink("Back to List", "ListRecords")
    </div>

    <script type="text/javascript">

        $("#btnAdd").click(function () {

            var PersonalDetails = {
                "FirstName": $("#FirstName").val(),
                "LastName": $("#LastName").val(),
                "Age": $("#Age").val(),
                "Active": $("#Active").val(),
                "AutoId": @Request.QueryString["autoid"]
            };
            $.ajax({
                type: "PUT",
                url:
                'http://localhost:28206/api/PersonalDetails/PutPersonalDetails/@Request.QueryString[
            "autoid"]',
                data: JSON.stringify(PersonalDetails),
            contentType: "application/json;charset=utf-8",
            success: function (data, status, xhr) {
                alert("The result is : " + status + ": " + data);
            },
            error: function (xhr) {
                alert(xhr.responseText);
            }
        });
        });

        function ShowDetails(id) {
            var myurl = 'http://localhost:28206/api/PersonalDetails/GetPersonalDetails/' + id
            $.ajax(
            {
                url: myurl,
                type: 'GET',
                dataType: 'json',
                success: function (person, status, xhr) {
                    $("#FirstName").val(person.FirstName);
                    $("#LastName").val(person.LastName);
                    $("#Age").val(person.Age);
                    document.getElementById("Active").value = person.Active;
                    $("#btnAdd").text("Update");
                },
                error: function (xhr, status, error) {
                    alert(error);
                }
            });
        }
        ShowDetails(@Request.QueryString["autoid"]);
    </script>
The above view is almost same as the Create view, we have made minor changes to fit for Update.
- We have changed the text of the button to “Update”
- On click of the Update button, in the PersonalDetails object, now are also sending the
AutoIdproperty whose value is the queystring value coming in to this page.
Now, notice the last part of the Script block. When the page loads, the ShowDetails() function is called with autoid querystring value that is nothing but the primary key value of the record selected for edit by the user.
ShowDetails() function calls GetPersonalDetails action method (below) of the Web API controller that gets the details of that record and set into the TextBoxes and DropDown respectively.
        // GET: api/PersonalDetailsAPI/5
        [ResponseType(typeof(PersonalDetail))]
        public IHttpActionResult GetPersonalDetail(int id)
        {
            PersonalDetail personalDetail = db.PersonalDetails.Find(id);
            if (personalDetail == null)
            {
                return NotFound();
            }

            return Ok(personalDetail);
        }
Now, when the Update button is clicked PutPersonalDetails action method (below) of the Web API controller is called (remaining code for the button click has been already explained while explaining how to create a new rocord into database by consuming ASP.NET Web API), that looks like below.
CONTROLLER ACION METHOD
        // PUT api/PersonalDetails/5
        public IHttpActionResult PutPersonalDetails(int id, PersonalDetails
personaldetails)
        {
            if (!ModelState.IsValid)
            {
                return BadRequest(ModelState);
            }

            if (id != personaldetails.AutoId)
            {
                return BadRequest("Sorry, seems something wrong. Couldn't determine
record to update.");
            }

            db.Entry(personaldetails).State = EntityState.Modified;

            try
            {
                db.SaveChanges();
            }
            catch (DbUpdateConcurrencyException)
            {
                if (!PersonalDetailsExists(id))
                {
                    return NotFound();
                }
                else
                {
                    throw;
                }
            }

            return Ok(personaldetails);
        }
Above action method checks for the valid state of the Model and then checks set the record state to “Modified” after validation and then returns Ok that shows the success messge to the user.


