 Online: 18147
ASP.NET MVC > Unit testing
Test mvc controller method for correct view in ASP.NET MVC
How to test ASP.NET controller method for correct view?
First reference necessary .dlls that help us to use classes to test the View. Our ASP.NET MVC Project is already referenced so we can use the Controller namespace so that we will be able to use its controller for the test.
Now add the reference of the System.Web.Mvc.dll that help us to use VIewResult class.
Now modify the default Test method to following
[TestMethod]
  public void TestMethod1()
  {
      //Arrange
      var controller = new PersonalDetailsController();

      // Act
      var result = controller.Create() as ViewResult;

      // Assert
      Assert.AreEqual("Create", result.ViewName);
  }
Notice the above Arrage / Act and the Assert. Unit test is written in three steps
- Arrange – Arrange the necessary infra to act. Ie instantiate necessary controller so that its method can be called for the testing.
- Act – call the method that needs a test.
- Assert – Now check whether the expected value is equal to the value returned from the method by calling Assert class methods
To view the test method created result. We need to open the Test Explorer. To begin the Test Explorer in front, following below steps
Go to TEST > Windows > Test Explorer that brings below window (Ignore what is showing in the Test Explorer for now).

To run the Test, Select TEST > Run > All Tests
OR
we can also right click the name of the Test method and select Run Selected Tests
OR
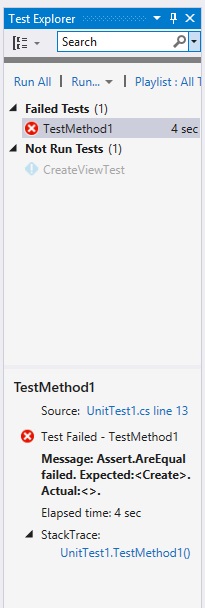
That start running the Test and the Test result is shown in the Test Explorer window.
The above test case will only pass if the Create action method of the PersonalDetailsController looks like below
PERSONALDETAILSCONTROLLER CREATE ACTION METHOD
// GET: PersonalDetails/Create
public ActionResult Create()
{
    //return View(); // will fail the test case
    return View("Create");
}
If we just return View() without the name of the View as parameter, the above Test method fails. However, the action method is correct in both cases and it gives the same result whether we pass View name as parameter or just return the View.


